
I’m going to run you through a basic image generation tutorial. I’ll start with a toy example and gradually add in more complexity.
I’m not going to assume any prior knowledge of machine learning or image generation, but I will expect you to be reasonably comfortable with probability and maybe calculus. Before we start, here’s a quick refresher on the basics of deep learning:
– Most of the models we use are made up of multiple layers of neurons, each of which combines the outputs from all the previous layers.
– These neurons are organized into layers of increasing complexity, from simple fully-connected layers (every neuron connects to every neuron in the next layer) to convolutional layers (neurons only connect to small regions in the previous layer) and recurrent layers (neurons connect to themselves).
-The most common activation functions are sigmoid (
This is a tutorial about image generation. We will attempt to build a program that generates images of pigeons and maps. The program will go through several iterations. Each iteration will add more detail to the image and try to fix problems in previous iterations.
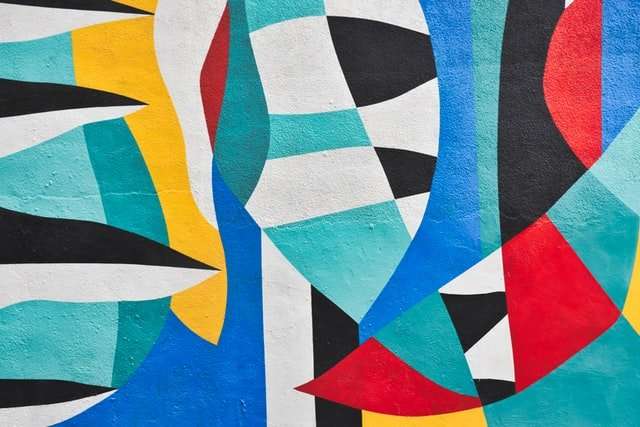
The end result should be a program that can generate images like this:
Or this:
Or this:
We will not be able to achieve this with one iteration but it will be an interesting goal to have.
Instructions for creating a simple image generation model in Caffe.
This is a tutorial on how to create a simple Generative Adversarial Network (GAN) in the Caffe deep learning framework.
The paper that introduced GANs, which are quite popular right now, is by Ian Goodfellow and others, and can be found here: https://arxiv.org/abs/1406.2661 .
Here’s a great video on GANs by one of their inventors: https://www.youtube.com/watch?v=IpzuzqSc_9Y .
Here’s an example of what we’ll be able to do at the end of this tutorial: http://www.stuffandnonsense.co.uk/caffe-gan/ .
The goal of this tutorial is to give you a good understanding of how basic, computer vision based image generation works. I assume that you know the basics of deep learning and are able to get it running on your machine. If you are not familiar with these things, you might want to start with a more general DL tutorial first.
There are three parts to this tutorial:
This was a bit difficult to get working, mostly because the documentation is lacking, but I managed to create a working version which I will share with you here. Again, the goal of this tutorial is not to teach you how to use Keras and Tensorflow (although I think it will help). It is rather supposed to give you an insight into how Convolutional Neural Networks (CNNs) can be used for generating images.
It’s a long time since I even attempted to create any kind of artwork. In fact, it’s probably been more than 10 years. My first attempt was a complete failure, so I decided that creating anything artistic was beyond me.
As I’ve gotten older and wiser (or at least older), my perception has changed over that period. I still don’t feel like an artist at all, but I do now think that there are many different ways in which one can create art.
I find random generation fun, relaxing, and exciting; a sort of Zen activity for the mind. It’s free from the constraints of time and money that apply to creativity within existing media; this means you can experiment as much as you like without having to worry about wasting too much time or money in the process. And because there are no constraints, you don’t have to compromise on your vision either. You can make everything exactly how you want it from the get-go, without having to worry about limitations imposed by some external medium. It’s also quite a meditative experience when you get into it…
Today we will look at how to create a generative drawing using code. This will be a relatively
It’s all about the math. I recently spent a lot of time experimenting with different ways to render images with code. The results were varied, but some of my experiments were very successful. This series is basically a step-by-step explanation of how I arrived at the best one.
In this tutorial we’re going to be using Python and PIL (Python Imaging Library).
Now, I know what you’re thinking: “Isn’t this just using the same old 8-bit color palette?” That’s where you’re wrong. Python has a library called PIL that allows us to create and manipulate images in a variety of formats. You can call it an image library or image manipulation library or an imaging library or even an imaging processing library–or anything else you want, for that matter. It can read several different file formats and save them as many different types of files, including 24-bit RGB TIFFs and PNGs.
This is similar to the technique used by Photoshop and Gimp . Take any image, run it through a filter (in this case, our Python program), and save it as another format such as JPG or PNG. It works particularly well for textural effects such as watercolor or oil painting .
It may seem like magic that a machine can create images of such beauty, but the process is not at all mysterious. In fact, it’s rather simple and works just like the process that goes on in your own mind when you try to visualize something.
The first step of the process is called “segmentation”, which divides an image into separate elements. Segmentation has multiple stages; first, a collection of simple features are extracted from the image. These features are then run through another neural network which converts them into more complex features.
Next, those complex features are converted into yet another set of features which represent the final visual representation of the image. This final representation can then be rendered into an actual image or animation as we see in the result above.
ArtsPainter is a contributor at Arts Painter. We are committed to providing well-researched, accurate, and valuable content to our readers.
Table of Contents


